Use editing software faster with these intuitive custom keyboard shortcuts, all on the left side of the keyboard, that allow you to keep your hand on the mouse at all times.
Download the keyboard view and list view of the shortcuts, plus the Premiere shortcut file HERE .
This tutorial teaches Premiere Pro by way of a completely custom keyboard shortcut layout with more than 30 shortcuts that are all on the left side of the keyboard so your right hand never needs to leave the mouse. These shortcuts will work just as well in Media Composer and Resolve (and just about any other NLE).
[Some things I wish I had done differently on this video:
A couple times I said click on something when I meant right-click.
When applying an effect to a clip, it’s faster to select the clip and double click on the effect rather than dragging the effect onto the clip.
Because of how Premiere handles snapping, I’ve come to like keeping it on for the most part, instead of off, as stated in the video. There are some faster ways of handling clips on the timeline involving using the razor blade and moving a clip, then extending the side with snapping on (Other NLEs still handle snapping in a bad way, where when you have it on, moving the playhead around the timeline snaps it to each edit. This is really annoying, and why I used to say keep it off for the most part).
When using Markers, it’s better to put the text describing the marker in the Comments field rather than the Name field.
I didn’t go into much about starting a timeline – the fastest way, if you want the parameters of the timeline to match the clip, is to drag one of your clips in your bin to the icon at the bottom right of the clip window that looks like a page with the corner turned up. You can then delete the clip in that timeline if necessary. And – remember to start a bin with for your sequences to keep things organized. You can make use of the little folder icon in the same location to do this (as opposed to right clicking and selecting New Bin).
I didn’t mention proxies at all. If you find it’s slow to move around your footage, especially when scrubbing through it quickly, make proxies by right clicking on a group of selected clips, or on a Bin, and selecting Proxies > Create Proxies. I recommend Frame Size: Half, Preset H.264 MP4 Proxy. Make sure to add the Toggle Proxies button on the Source and/or Timeline window by pressing the + under the window. This Toggle Proxies icon looks like two small squares with arrows pointing at each other. The footage will look a bit worse when proxies are on, especially blown up, but you can check how it really looks by toggling that icon off and on (when the icon is blue, proxies are on). When you export, it will always export at full resolution. My first step in starting a project is importing all the footage, and if it’s 4K and I know it’s going to bog things down, create proxies for everything, and come back in a couple hours when it’s done.
Regarding the Link Selection button for linking audio and video tracks – I don’t really ever put that on anymore. I find it easier to keep it off all the time, and if I want audio and video to move together, say during a trim operation, I just select both the audio and video tracks.
Regarding needing to make sure nothing is selected on the timeline when using W, delete and close up the hole – I find this really annoying and wish Premiere would do something about it. To get around this issue, I’ve programed one of the side buttons on my Logitech mouse to trigger the Deselect All key (Shift+Cmd+A on Mac for instance). I’m just in the habit of quickly pressing that key on the mouse before hitting W to close up the hole in the timeline. I highly recommend a programmable mouse. I use this one.
Instead of using the Comments field to leave comments in the clip window, which requires going to the Metadata Display window and adding the Comments field, better to use the Description field that is already there by default.
It’s been several years since I made this video, there’s actually a lot I do differently (and better now). A new video is needed… DB, 2026]
This might be the only editing tutorial that uses, as an editing example, the editing of the tutorial you’re watching.
The only reason the shortcut for Mark In is “i” and Mark Out is “o” is because In and Out start with “i” and “o”. For millions of years this is how it’s been – I guess so people just starting to use the software could remember where the shortcuts were. But we’ve evolved since those early days. We walk upright now, and we don’t need to use those ancient shortcuts that are in all the wrong places. It’s the same with the transport keys J and K – these have been Transport Backward and Forward since the dawn of time. But they’re in a horrible location.
Look down at the home row on your keyboard: ASDF – this is where your left hand rests, and, with my new enlightened shortcuts, these are the keys used for Mark In (A), Mark Out (F), Frame Back (S), Frame Forward (D), and Transport Backward (X) and Forward (C) right under the home row. See how much more conveniently located these are?
Check out a short clip of me using these shortcuts to edit the West Wing 2002/2020 intercut (relocated video).
And, all the shortcuts are this intuitive, plus they are all either the key or shift+the key – no command/control+shift nonsense. I’ve also moved the often used copy/paste and undo/redo to a better location, and if you switch between Mac and PC you won’t have to get used shifting between using Control-C and Command-C, for instance – it will be exactly the same no matter what computer you’re using.
I’ve been a video editor since 1996. I had worked in digiBeta digital tape-to-tape rooms until 2005, when I started using Final Cut Pro. When I first sat down to use the software I noticed the keyboard shortcuts layout seemed to be designed by software engineers, not video editors, and the shortcuts were kind of all over the place, sometimes requiring awkward key combinations (like command+shift, etc.). Before making my first edit I re-arranged these shortcuts, and have been perfecting them ever since.
I’ve encountered editors who say they only use the default shortcuts in case they need to use another computer. Email the the shortcut file to yourself or put it on a thumbdrive (or learn how to enter them in quickly). Problem solved.
If you know how to type, these shortcuts are for you. If you don’t know how to type, learn (seriously, if you’re going to be an editor, learn to type). Also, if you edit by dragging footage from the Source window to the Timeline, this tutorial is for you (seriously, stop editing by dragging footage to the timeline, it’s slow and horribly inefficient).
You can download images of the keyboard layout and the Premiere keyboard shortcut file. There are also links to download six short clips that I use in the tutorial so you can start working and learning right away. In the video I explain where to put the Premiere shortcut file on your computer.
I recommend watching this tutorial on a second monitor or laptop while you have Premiere open, and working along with me. This is not necessary, but helpful. You can pause the video as you go, and use the left and right arrow keys on your keyboard to backup and go forward in the video. I also suggest printing out the keyboard layout to have in front of you.
You may be asking, why do I care – am I trying to sell you something, why so pushy with these shortcuts? All excellent questions (and no, I’m not trying to sell you something – I’m just giving this shit away).
The tutorial is HERE.
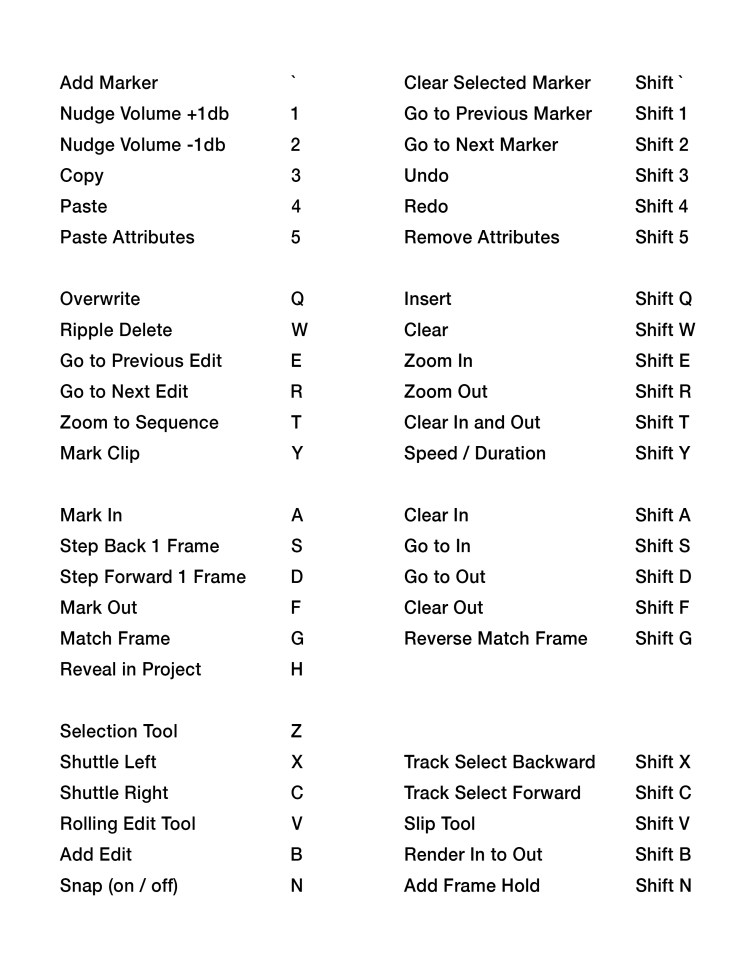
Download the keyboard view and list view of the shortcuts, plus the Premiere shortcut file HERE . If you feel apprehensive about downloading an unknown zip file, the images are below. You can either enter the shortcuts in yourself, or email me at daveditor@gmail.com and I’ll send you the .kys shortcuts file.
Download the six short video clips from Vimeo here: CLIP 1,CLIP 2,CLIP 3,CLIP 4,CLIP 5,CLIP 6. Click Download and choose Original (this is footage that I shot and used in THIS VIDEO).
Here are the shortcuts. They’re worded for Premiere, but they’ll work on any NLE (within reason). Learn them, use them, live them. You are now enlightened. Poof! I’m gone.